I've added a mutex using the POSIX pthread librairy to make sure the I2C address selection and IO operations are safe in a multi-threaded environment.
And I'm also making the code public on BitBucket.
https://bitbucket.org/sygnet/quadrasppi_public/src
Showing posts with label pi. Show all posts
Showing posts with label pi. Show all posts
Wednesday, 19 August 2015

Tuesday, 18 August 2015
I2C interface class in C++
Now that I have my PCA9685 I2C module properly connected to the Pi I2C bus comes the time of interfacing with it.
I decided to have a pure virtual IBus interface that could be used no matter what the underlying implementation is. The bus doesn't even have to be I2C, could be serial, or whatever. This way you just pass a pointer to the bus object to any routine that needs to communicate on the bus and it just calls pretty generic functions to read/write data to a device address/register pair (the register value could even be abstracted to be just a control command).
Here's what the class looks like:
The Raspian I2C implementation class derives from it.
The Linux/Raspbian implementation of I2C relies on the concept of device objects that are accessible like all files on the file system through read/write/IOCtl commands. You just need to have the right modules loaded in memory (that's what we did in the last post) and the right headers files to start coding.
The I2C bus device file is opened in R/W access in the class constructor. The port number depends on your Pi revision.
Important Note: Due to my implementation where a single pointer to a I2C class object is expected to be used everywhere in the code, we need to pay attention to the case where the process is multithreaded. If two threads are trying to access different devices on the bus, then we must insure that the selected address doesn't change (modified by a parallel thread) until the I/O is performed on the bus. To do this, I'll implement a POSIX mutex to make sure the Address Selection + IO operation becomes atomic.
I decided to have a pure virtual IBus interface that could be used no matter what the underlying implementation is. The bus doesn't even have to be I2C, could be serial, or whatever. This way you just pass a pointer to the bus object to any routine that needs to communicate on the bus and it just calls pretty generic functions to read/write data to a device address/register pair (the register value could even be abstracted to be just a control command).
Here's what the class looks like:
class IBus
{
protected:

 bool debug;

public:
 IBus (bool debug = false) {
  this->debug = debug;
 }
 virtual int ReadRegisterByte (int addr, int reg)= 0;
 virtual int WriteRegisterByte (int addr, int reg, int data) = 0;
};
The Raspian I2C implementation class derives from it.
class I2CRaspbian: public virtual IBus
{
private:

 int fd; // file descriptor
 int selectedAddr; // currently selected device address
 int SelectAddr (int addr); // change device address selection

public:

 I2CRaspbian (int port, bool debug = false);
 virtual int ReadRegisterByte (int addr, int reg);
 virtual int WriteRegisterByte (int addr, int reg, int data);
};
The Linux/Raspbian implementation of I2C relies on the concept of device objects that are accessible like all files on the file system through read/write/IOCtl commands. You just need to have the right modules loaded in memory (that's what we did in the last post) and the right headers files to start coding.
#include <errno.h>
#include <string.h>
#include <stdio.h>
#include <stdlib.h>
#include <unistd.h>
#include <linux/i2c-dev.h>
#include <sys/ioctl.h>
#include <sys/types.h>
#include <sys/stat.h>
#include <fcntl.h>
The libi2c-dev module we installed contains user mode SMBUS function implementation that would normally only be available to a driver in kernel mode - the implementation relies solely on reading/writing through IOCTL ops. This is required to read from a device register. You don't need it if you only want to read data from a register-less device.
The I2C bus device file is opened in R/W access in the class constructor. The port number depends on your Pi revision.
I2CRaspbian::I2CRaspbian(int port, bool debug) : IBus(debug)
{
 // no address currently selected
 this->selectedAddr = 0;

 // generate I2C device filename based on port number
 char filename[40];
 sprintf(filename, "/dev/i2c-%i", port);
 debug_print("Opening I2C channel on %s\n", filename);

 // open a the device file in R/W
 if ((this->fd = open(filename, O_RDWR)) < 0) {
  printf("Failed to open the bus.\n");
  exit(1);
 }
}
Before writing to or reading from a device, we need to select its address on the bus using IOCTL commands. The I2C_SLAVE is defined in the header we got when installing i2c-dev. int I2CRaspbian::SelectAddr (int addr)
{
// make sure to change the device address selection if its different from
// the previous I/O
if (this->selectedAddr != addr)
{
debug_print("Changing device address selection.\n");
if (ioctl(this->fd, I2C_SLAVE, addr) < 0) {
printf("Failed to acquire bus access and/or talk to slave.\n");
exit(errno);
}
this->selectedAddr = addr;
}
return 0;
}
To read from a device register, use the SMBUS interface (translate the read into an IOCTL):int I2CRaspbian::ReadRegisterByte (int addr, int reg){
// Select device
SelectAddr(addr);
// Read data using SMBUS interface
int data = i2c_smbus_read_byte_data(this->fd, reg);
debug_print("Read data from reg 0x%02X: 0x%02X\n", reg, data);
return data;
}
To write to a device register, you can use a standard write command:int I2CRaspbian::WriteRegisterByte (int addr, int reg, int data)
{
// Select device
SelectAddr(addr);
// Set buffer to write
char buf[2] = {0};
buf[0] = reg;
buf[1] = data;
// Write data using standard file write interface
debug_print("Write data to reg 0x%02X: 0x%02X.\n", reg, data);
if (write(this->fd, buf, 2) != 2) {
printf("Failed to write to the i2c bus.\n");
return errno;
}
return 0;
}
Important Note: Due to my implementation where a single pointer to a I2C class object is expected to be used everywhere in the code, we need to pay attention to the case where the process is multithreaded. If two threads are trying to access different devices on the bus, then we must insure that the selected address doesn't change (modified by a parallel thread) until the I/O is performed on the bus. To do this, I'll implement a POSIX mutex to make sure the Address Selection + IO operation becomes atomic.
Monday, 17 August 2015
Enabling I2C
I've received the parts.


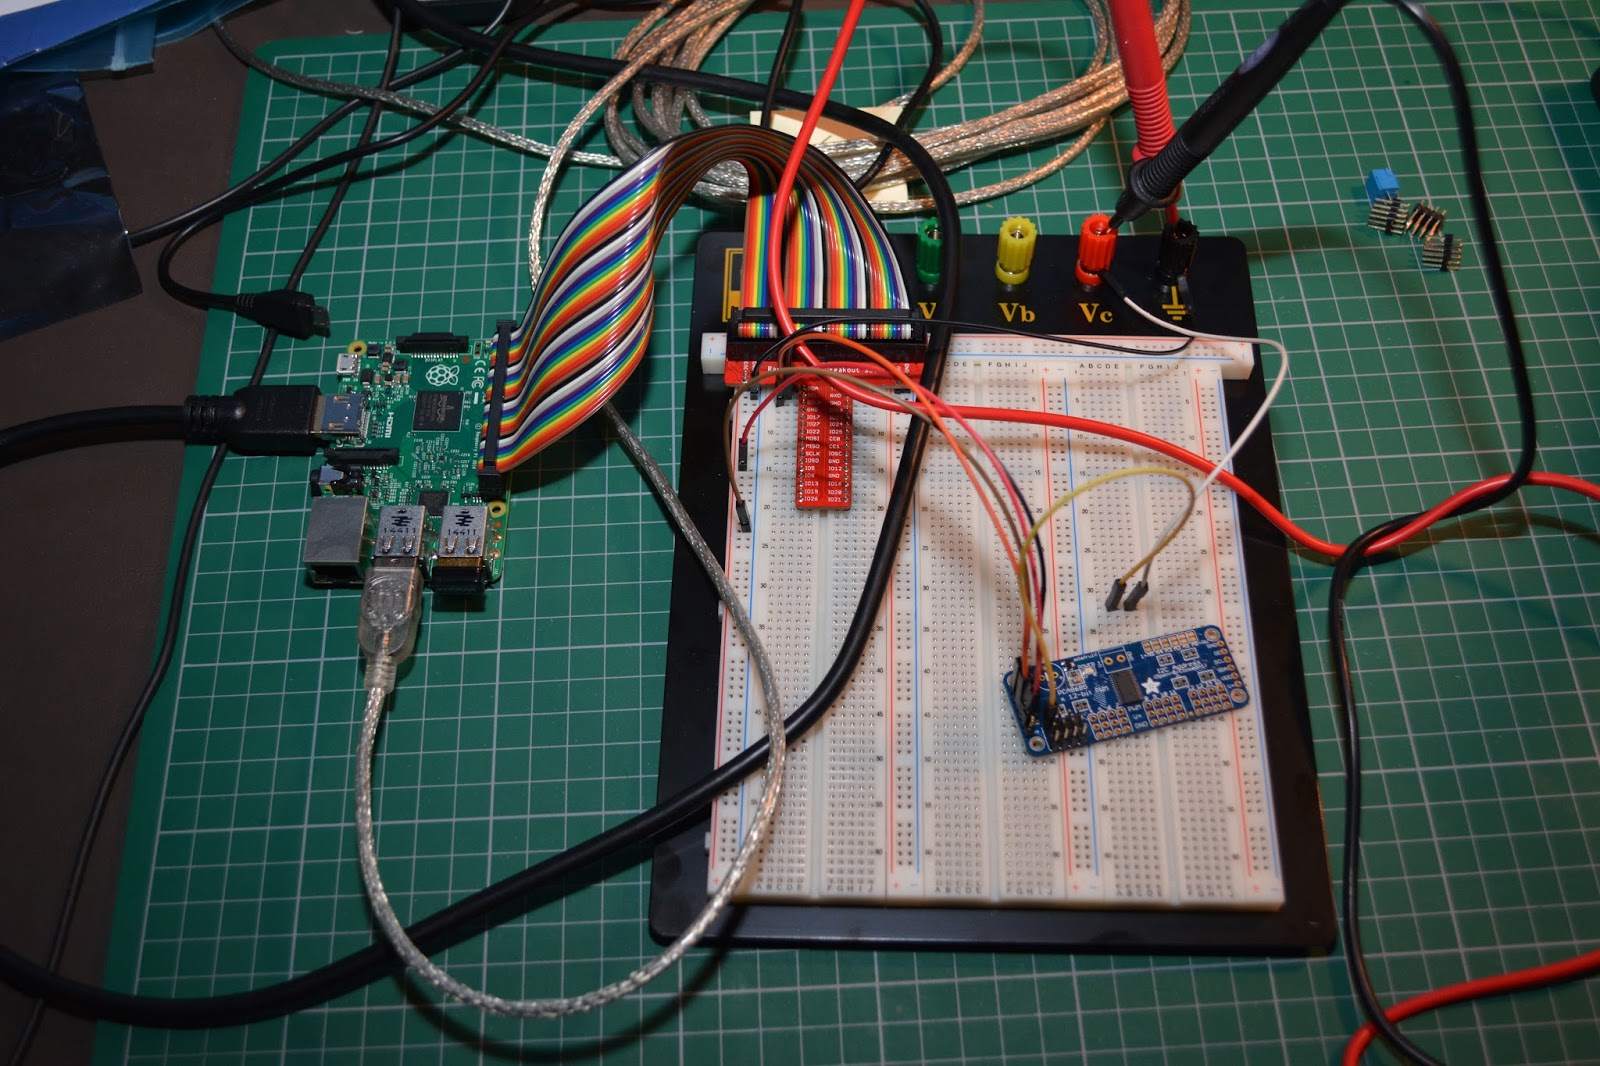
Connecting the PCA9685 module is quite simple and straightforward.
Since I'm not driving any motors yet, I don't need to connect anything else.
Make sure that you connect the PCA9685 VCC pin to the 3.3Volt pin of the Pi, and not the 5V pin.
5V power would need to be connected to the V+ pin to drive motors, LEDs, etc., and would need to come from a separate power supply in order not to drain too much power from the Pi and interfere with its stability.
The PCA9685 board also has jumpers that you can solder to change the address of the module on the I2C bus. By default the address is 0x40.
Once that's all connected, power up the Pi and install the correct tools and libraries. I'll develop in C++, but it doesn't hurt to have the Python stuff as well. By the way, SMBus is a derivative of the I2C bus and that's why some tools are common.

I'll interface with the device in C++ in the next post...
- PCA9685 - the Adafruit module wasn't pre-assembled so I had to do some basic soldering to put the connectors on. Nothing complex, but I had to remaster some old skills.
- Breakout cable - there were absolutely no indications on the cable as to its proper orientation on the Pi side. I initially connected it the wrong way and I think I may have shorted some GPIO pins while trying to figure out why there were no signals on random pins when playing with some GPIO tools. Beware - use a voltmeter and make sure the pins are coming up at their expected positions on the other side of the cable before attaching any components to it on a breadboard.
Here's what my setup looks like.

| Pi | connected to | PCA9685 |
| GND | GND | |
| 3.3V | VCC | |
| SDA | SDA | |
| SCL | SCL |
Make sure that you connect the PCA9685 VCC pin to the 3.3Volt pin of the Pi, and not the 5V pin.
5V power would need to be connected to the V+ pin to drive motors, LEDs, etc., and would need to come from a separate power supply in order not to drain too much power from the Pi and interfere with its stability.
The PCA9685 board also has jumpers that you can solder to change the address of the module on the I2C bus. By default the address is 0x40.
Once that's all connected, power up the Pi and install the correct tools and libraries. I'll develop in C++, but it doesn't hurt to have the Python stuff as well. By the way, SMBus is a derivative of the I2C bus and that's why some tools are common.
sudo apt-get install python-smbusOpen /etc/modules
sudo apt-get install i2c-tools
sudo apt-get install libi2c-dev
sudo nano /etc/modulesAdd those lines and reboot.
i2c-devSince I have the Raspberry Pi 2, the I2C bus is on port 1 (instead of 0). To get the list of attached devices, run this command. It will search the /dev/i2c-1 device for all addresses and list them on the console.
i2c-bcm2708
sudo i2cdetect -y 1

I'll interface with the device in C++ in the next post...
Thursday, 13 August 2015
Setting up the development environment
My workstation runs Windows 10 and my Linux college days were a long time ago, so I'd like to do the C++ software stack development on Windows. Additionally, based on what I gathered reading blogs and forums, the recommended environment for C++ on the Pi is NetBeans.
Since cross-compiling for ARM on my Intel box is non-trivial, the approach I've chosen is to develop on Windows using NetBeans and use the Pi as a compilation host using SSH tunneling. This way all binaries are compiled and built natively on the target execution platform. No hassle ! :-)
I also want to check my code on a cloud repository for backup, share the code and get contributions from my electrical engineer friend. I decided to go with BitBucket as it's free and Git-based. NetBeans natively supports Git so linking the project to BitBucket is quite simple and I'll skip documenting this step.
Step 1 - Enable Root login for SSH
You first need to tweak your Pi's SSH configuration a little to allow root (like admin account on Windows) login. Root permissions will be required to achieve the next steps.
On the Pi's console, first set a password for the root user:
Step 2 - Install and Configure
I downloaded NetBeans 8 from https://netbeans.org/downloads/ (get the one that says C/C++) and proceeded to install it on my workstation.
Once in NetBeans and a new project is created, you'll need to define the Raspberry Pi compilation host settings. Before you proceed further, make sure your Pi is up and running, connected to your network and that you have its IP address noted.
Navigate to the Services tab in the left window pane. Right-click on the C/C++ Build Host node and select Add new host.
Enter the IP address of the Pi in the hostname. The default SSH port is 22. Change the port number if you've modified the SSH default configuration.

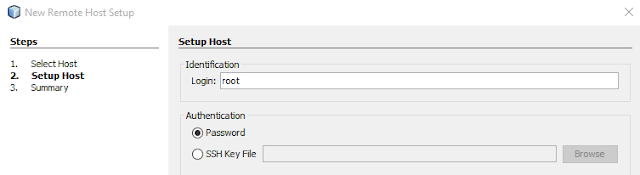
Enter root as the login and select password as the authentication method, then click next.

Since cross-compiling for ARM on my Intel box is non-trivial, the approach I've chosen is to develop on Windows using NetBeans and use the Pi as a compilation host using SSH tunneling. This way all binaries are compiled and built natively on the target execution platform. No hassle ! :-)
I also want to check my code on a cloud repository for backup, share the code and get contributions from my electrical engineer friend. I decided to go with BitBucket as it's free and Git-based. NetBeans natively supports Git so linking the project to BitBucket is quite simple and I'll skip documenting this step.
Step 1 - Enable Root login for SSH
You first need to tweak your Pi's SSH configuration a little to allow root (like admin account on Windows) login. Root permissions will be required to achieve the next steps.
On the Pi's console, first set a password for the root user:
sudo passwd rootYou should now be able to login as the root user using Putty. If it doesn't work, check the SSH daemon configuration to make sure it allows root login.
sudo nano /etc/ssh/sshd_configMake sure you have this line somewhere in the file:
PermitRootLogin yesRestart the daemon if you've change the config file:
sudo /etc/init.d/ssh restartIf you need to remove the root login at a later time (for security purposes), run this command:
sudo passwd -l root
Step 2 - Install and Configure
I downloaded NetBeans 8 from https://netbeans.org/downloads/ (get the one that says C/C++) and proceeded to install it on my workstation.
Once in NetBeans and a new project is created, you'll need to define the Raspberry Pi compilation host settings. Before you proceed further, make sure your Pi is up and running, connected to your network and that you have its IP address noted.
Navigate to the Services tab in the left window pane. Right-click on the C/C++ Build Host node and select Add new host.
Enter the IP address of the Pi in the hostname. The default SSH port is 22. Change the port number if you've modified the SSH default configuration.

Enter root as the login and select password as the authentication method, then click next.

You'll be asked to enter the password you've previously created for root.
Once you click Ok, NetBeans will start configuring the Pi to handle the build process.
In NetBeans, click the compile button and make sure that the compilation process completes successfully. You should see BUILD SUCCESSFUL in the console window.
Getting the Raspberry Pi up and running
I received the Raspberry Pi 2 and a 8GB uSD card, along with the WiFi dongle I ordered. The dongle is Edimax EW-7811Un. Let's get this thing up an running.
Step 1 - Image the SD card
I needed to image the SD card with the Raspbian Linux distro. I followed the official instructions. Get the latest distro image from raspberrypi.org/downloads and use the simple Win32DiskImager tool to write it to the SD volume.
Step 2 - Booting
I hooked up the Rasperry Pi to a HDMI monitor and a USB KVM-switch to get mouse/keyboard input, inserted the SD card and USB WiFi dongle, then powered on using the provided 5V AC/DC micro USB adaptor.
The Pi quickly boots and you end up on the raspi-config console UI. You may want to:
Then edit the network settings:
Step 4 - Configuring SSH
In order to remotely work on the Pi, you need to start the SSH service and have it run on boot.
Step 5 - Updates
Finally, let's update the packages and the firmware:
Step 1 - Image the SD card
I needed to image the SD card with the Raspbian Linux distro. I followed the official instructions. Get the latest distro image from raspberrypi.org/downloads and use the simple Win32DiskImager tool to write it to the SD volume.
Step 2 - Booting
I hooked up the Rasperry Pi to a HDMI monitor and a USB KVM-switch to get mouse/keyboard input, inserted the SD card and USB WiFi dongle, then powered on using the provided 5V AC/DC micro USB adaptor.
The Pi quickly boots and you end up on the raspi-config console UI. You may want to:
- Change the default password for the Pi user.
- Enable SSH from the advanced menu (will use that to remotely log in the Pi)
- Enable I2C from the advanced menu (will need that when we start playing with I2C ICs)
- Exit, reboot and login as Pi user
Step 3 - Configure WiFi
First thing first, we need network access. Let's make sure that the OS sees the EDIMAX dongle.
dmesg | moreSomewhere in the output you should see a line that says "802.11n WLAN Adapter".
Then edit the network settings:
sudo nano /etc/network/interfacesModify the file to look like this:
auto loReload the network configuration
iface lo inet loopback
iface eth0 inet dhcp
allow-hotplug wlan0
auto wlan0
iface wlan0 inet dhcp
wpa-ssid "Your Network SSID"
wpa-psk "Your Password"
sudo service networking reloadCheck the status of the WiFi connection and make sure you have a valid IP address
ifconfigI then reserved the IP address of the Pi in the router configuration so that it never changes after reboots.
Step 4 - Configuring SSH
In order to remotely work on the Pi, you need to start the SSH service and have it run on boot.
sudo /etc/init.d/ssh startGoing forward I'll use SSH to work directly from my workstation and remotely log in the Pi. If you're on Windows, you can download Putty as your SSH client.
sudo update-rc.d ssh defaults
sudo reboot
Step 5 - Updates
Finally, let's update the packages and the firmware:
sudo apt-get update
sudo apt-get upgrade
sudo apt-get clean
sudo rpi-update
sudo ldconfig
sudo reboot
Resources
Subscribe to:
Posts (Atom)